Showing posts with label SharePoint 2013. Show all posts

Wednesday, 9 December 2015

There are no items to show in this view of the list. Customize default message using content Editor Webpart in SharePoint

When a list or library does not have any items in it, a message will display in the view as in the screenshot.


If you want to customize the message, just add the below scripts in content Editor web part and Save the page. 

Go to the page where you have placed the list which you want to modify, Site Action-> Edit Page->select add a web Part->choose Content Edit Web Part. then you need to add the following sample code in Source Edit.

<script>
function ChangeEmptyLibraryMessage()
{
  var a = document.getElementsByTagName("TD")
  for (var i=0;i<a.length;i++)
  {
    if (a[i].className=="ms-vb")
    {
      a[i].innerHTML = "There are no items to display here.";
    }
  }
}
_spBodyOnLoadFunctionNames.push("ChangeEmptyLibraryMessage") 
</script> 

The shaded message will show in the place of default message.


The above script will be for that particular page where you have placed it.

If you want to change the default message in all list in the site, open the Default.apsx page in SharePoint Designer search for “There are no items to show in this view of” text in the code and replaced the text with the message you want to display. This will work for all lists and calendar events.

Sunday, 1 February 2015

Sorry, something went wrong error in Sharepoint 2013 site

Sometimes we get 'Sorry, something went wrong error' when we upload large sized files to share Point 2013 sites. 

Normally this error is related to execution Timeout . If we increase the default  execution Time out 360 seconds to some other value, this error will solve.
Steps to modify the default execution Timeout ,
1.  open the web.config file in the directory C:\Program Files\Common Files\Microsoft Shared\Web Server Extensions\15\TEMPLATE\LAYOUTS ,
2. change execution Timeout to your time. Below  is the screenshot.
 
Hope this helps...

Wednesday, 5 November 2014

Top navigation style issue in settings.aspx SharePoint 2013

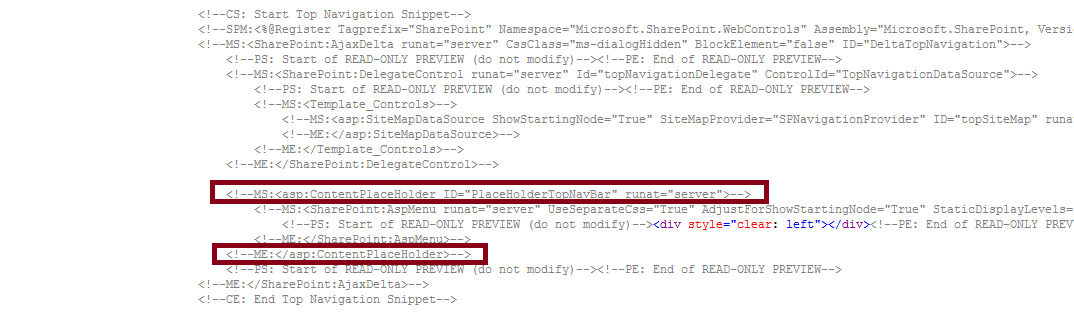
I had come up a strange issue after applying a custom master page to my SharePoint site.The Top navigation was showing correctly in all pages. But Site Settings page and site column page  were rendering differently than the rest of the site. Below steps helped me to resolve this issue.

1. Search for ID="PlaceHolderTopNavbar"

2. Bring  the Sharepoint:AspMenu control outside of this placeholder and delete asp:ContentPlaceHolder tag
   
Hope this helps...

Friday, 11 July 2014

Error loading navigation: The Managed Navigation term set is improperly attached to the site. SharePoint 2013


I had come up with this error when I restored my back up to a new web application. After doing the below trick it started to show the navigation tabs

Go to site settings -> Navigation.  Select "Structural Navigation" for global and current Navigation,
Save it and set back to Managed Navigation.

Hope this helps...

Redirecting to a page from a list form button through SharePoint Designer

There are times when you want to redirect to a different page after adding a new item in a list. Here I have done this by creating a new list form and editing the default close/save button using SharePoint Designer. The steps are as below

  • Open the list in share point designer and create a new list form 


set the new form as default list form


  • Edit the form in advance mode.
  • If you want to redirect Close button URL, Search for SharePoint:GoBackButton. Delete the default close button and insert SharePoint form action button from the ribbon bar.  


 select navigate to the page from action list and click settings to specify your URL. If you take a look at the  code behind of the button you will see the following:
                        
<input name="close1" type="close" value="close" onclick="javascript: {ddwrt:GenFireServerEvent('__redirect={Test.aspx}')}"
  • If you want to redirect Save button URL, Search for  SharePoint:SaveButton. Delete the default save button and insert SharePoint form action button from the ribbon bar.  Select Commit and Navigate to page (in this order). Select the Navigate to page (right side) and click settings to specify your home page. 
          If you take a look at the code behind of the button you will see the following:   
  <input name="save1" type="save" value="save" onclick="javascript: {ddwrt:GenFireServerEvent('__commit;__redirect={Test.aspx}')}"
  • Save and Test

Thursday, 8 May 2014

How to save Publishing Site as template SharePoint 2013

SharePoint doesn’t support saving publishing sites as a template. But there is an easy way to save the template of a publishing site in SharePoint 2013 . The steps are as below.

1.Deactivate the Publishing feature of the site.
2. Open the site in SharePoint Designer 2013.
3. In SharePoint Designer, under Sites tab select “Site Options” (see screen below)
4. Find 'SaveSiteAsTemplateEnabled' in Site Options (see below). 
5. Click on Modify button and change value “true”.

6. Now you can find 'Save site as template' Option under Site Settings (http://sitename/_layouts/15/settings.aspx) and create the template.
7. Your template is saved under solution gallery(/_catalogs/solutions/Forms/AllItems.aspx)
 

Tuesday, 15 April 2014

How to login with different user in SharePoint designer

To start SharePoint Designer 2013 as another SharePoint user, Start the Spedesign.exe process by using a different user account. Steps to do this.

1. Go to the SharePoint Designer 2013 installation folder. By default, the folder is installed in the following location:
C:\Program Files\Microsoft Office\Office15
2. Press and hold the Shift key, right-click Spedesign.exe, and then click Run as different user.
3. Type the credential of the user and then click OK.


Thursday, 3 April 2014

Poll webpart for SharePoint

Found this link very useful for creating Poll Web part in SharePoint web application.
http://spjsblog.com/2010/11/23/poll-for-sharepoint/

How to map a network drive to the master page gallery sharepoint 2013

There is an easy way to upload design files or packages by mapping the Master Page gallery to a Network drive.
Before doing the below steps make sure Web Client service is started under services. If the Web Client service name is not present you must install the Desktop Experience Windows feature .

The steps to map a network drive to gallery
1. Click on Design Manager in your publishing site.
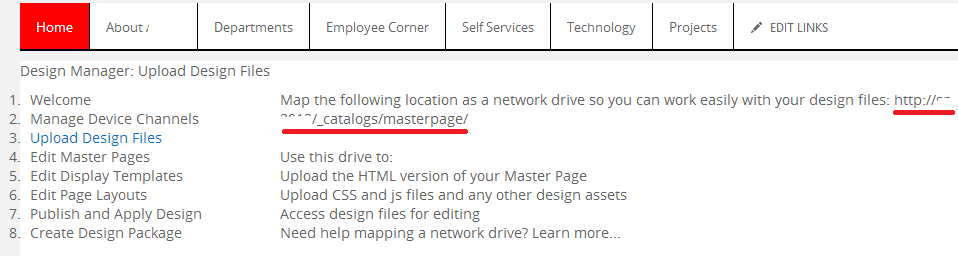
2. Select the third option Upload Design File

 
Here we can check the page that contains the location of Master Page Gallery. Location ends with /_catalogs/masterpage as shown in the image above. This is the location that we need to map the network drive.
 
3. Right click the computer and select 'Map network drive'


4. Select any Drive and click the red marked link
5. Paste the url to the master page gallery
6. Now our mapped folder is under network location. By checking the mapping folder, we can see all the master pages

Friday, 14 March 2014

How to Disable loopback check

Some times we might get 401.1 Access denied error when trying to access the fully qualified domain name (FQDN) of our SharePoint site from the server. To fix this add a registry key to disable the loopback check. There are two options to do this.

By Manually

  1. Click Start, click Run, type regedit, and then click OK.
  2. Locate and then click the following registry subkey: HKEY_LOCAL_MACHINE\SYSTEM\CurrentControlSet\Control\Lsa
  3. Right-click Lsa, point to New, and then click DWORD Value.
  4. Type DisableLoopbackCheck, and then press ENTER.
  5. Right-click DisableLoopbackCheck, and then click Modify.
  6. In the Value data box, type 1, and then click OK.
  7. Exit Registry Editor.

By Power Shell Command

New-ItemProperty HKLM:\System\CurrentControlSet\Control\Lsa -Name "DisableLoopbackCheck" -value "1" -PropertyType dword

Make sure to reboot your server afterwards.
Hope this helps...

Monday, 3 March 2014

InfoPath cannot save the following form. This document library was either Deleted or renamed

I have faced this issue recently on my new SharePoint 2013 server. The scenario was when I publish the form to a library, the form creates the library, but when I click OK on the error message window the Library disappears from the site.


To workaround this issue

2. Reboot the server
3. After that start Themes service form Windows Service Console

Hope this helps.