Friday, 21 March 2014

An exception occurred while enqueueing a message in the target queue. Error: 15404, State: 19. Could not obtain information about Windows NT group/user, error code 0x5

Recently my DB server ran out of space and DB Error LOG file was occupying about 20 GB. When I checked Application Event log of my DB Server and saw an error filling up around 20 times in 1 second.

An exception occurred while enqueueing a message in the target queue. Error: 15404, State: 19. Could not obtain information about Windows NT group/user 'Domain\user', error code 0x5.


The SQL Server service account and the SQL Server Agent account requires the same account but with DOMAIN ADMIN privileges. In my case the SQL DB service was ran by local administrator. I have changed local administrator to domain user account and restarted the service.

Then SQL comes up without any of these messages in the Event Viewer and DB Error log file stopped generating.

Hope this helps anyone else having the same issue.

Wednesday, 19 March 2014

Automatically create Items in a SharePoint Library using a SharePoint Designer workflow

There might be some requirements like create an item automatically in a library/list when an item is added in to a different library/list.

For this create a workflow in SharePoint designer for first Library which creates a new Item on second Library with the given item values and set the workflow to "Start workflow automatically when an item is created". Steps are as follows

Step 1. Add a Create List Item action.


Step 2. Click the “this list” link, and in the dialog box, select the document library to which you attached your custom content type. This will give you two values to fill out, one for the Content Type ID and one for the Path and Name, the latter being a required field in the Document content type.

Step 3. You can add different columns which you want to be auto populated by the column values from first list. For this create the Columns you want in the second list and map with corresponding columns with first list columns as shown in the below screen.

If the selected list is a form library the Content Type ID will be Form, or it is a document library the Content Type ID will be Document.
Step 4. Modify the “Path and Name” value to [%Current Item: Name%]. If you want a word document to be created, just change the value of Path and Name field as [%Current Item: Name%].docx
Step 5. Click OK. Save and publish the workflow.
 
Go back to your SharePoint list that’s associated to workflow you just created and create a new item.  When the Create Item action is executed, a new entry should be created in your second List and columns also auto populated from first list.

Hope this helps..

Tuesday, 18 March 2014

Email is not syncing after full user profile synchronization SharePoint 2013

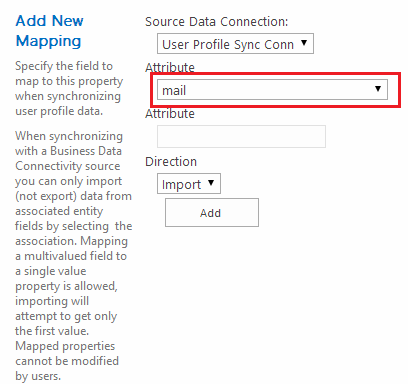
Recently I got stuck with this issue and had tried recreating user profile service and full synchronization. Finally I came to know that by default User profile application is syncing the Work Email with AD attribute proxyAddresses and not with the attribute mail. Then I changed AD attribute proxyAddresses to mail and did a full synchronization. Email Addresses are started showing for each user in Central Admin. Steps are as follows

Step 1. First check if the User Profile Sync Service has started form system settings->manage services on server

Step 2. From Application management -> manage service applications->User Profile Service Application -> manage properties->select work email and edit the property


Step 3. Click the button 'Remove' and select 'mail' from attributes and click Add

Screen 1


Now the work mail is configured with mail attribute


Step 4. Start a full sync after changing this setting and the mail addresses will be filled in for users.


Friday, 14 March 2014

How to Disable loopback check

Some times we might get 401.1 Access denied error when trying to access the fully qualified domain name (FQDN) of our SharePoint site from the server. To fix this add a registry key to disable the loopback check. There are two options to do this.

By Manually

  1. Click Start, click Run, type regedit, and then click OK.
  2. Locate and then click the following registry subkey: HKEY_LOCAL_MACHINE\SYSTEM\CurrentControlSet\Control\Lsa
  3. Right-click Lsa, point to New, and then click DWORD Value.
  4. Type DisableLoopbackCheck, and then press ENTER.
  5. Right-click DisableLoopbackCheck, and then click Modify.
  6. In the Value data box, type 1, and then click OK.
  7. Exit Registry Editor.

By Power Shell Command

New-ItemProperty HKLM:\System\CurrentControlSet\Control\Lsa -Name "DisableLoopbackCheck" -value "1" -PropertyType dword

Make sure to reboot your server afterwards.
Hope this helps...

Monday, 3 March 2014

InfoPath cannot save the following form. This document library was either Deleted or renamed

I have faced this issue recently on my new SharePoint 2013 server. The scenario was when I publish the form to a library, the form creates the library, but when I click OK on the error message window the Library disappears from the site.


To workaround this issue

2. Reboot the server
3. After that start Themes service form Windows Service Console

Hope this helps.