Wednesday 5 November 2014

Top navigation style issue in settings.aspx SharePoint 2013

I had come up a strange issue after applying a custom master page to my SharePoint site.The Top navigation was showing correctly in all pages. But Site Settings page and site column page  were rendering differently than the rest of the site. Below steps helped me to resolve this issue.

1. Search for ID="PlaceHolderTopNavbar"

2. Bring  the Sharepoint:AspMenu control outside of this placeholder and delete asp:ContentPlaceHolder tag
   
Hope this helps...

Friday 11 July 2014

Error loading navigation: The Managed Navigation term set is improperly attached to the site. SharePoint 2013


I had come up with this error when I restored my back up to a new web application. After doing the below trick it started to show the navigation tabs

Go to site settings -> Navigation.  Select "Structural Navigation" for global and current Navigation,
Save it and set back to Managed Navigation.

Hope this helps...

Redirecting to a page from a list form button through SharePoint Designer

There are times when you want to redirect to a different page after adding a new item in a list. Here I have done this by creating a new list form and editing the default close/save button using SharePoint Designer. The steps are as below

  • Open the list in share point designer and create a new list form 


set the new form as default list form


  • Edit the form in advance mode.
  • If you want to redirect Close button URL, Search for SharePoint:GoBackButton. Delete the default close button and insert SharePoint form action button from the ribbon bar.  


 select navigate to the page from action list and click settings to specify your URL. If you take a look at the  code behind of the button you will see the following:
                        
<input name="close1" type="close" value="close" onclick="javascript: {ddwrt:GenFireServerEvent('__redirect={Test.aspx}')}"
  • If you want to redirect Save button URL, Search for  SharePoint:SaveButton. Delete the default save button and insert SharePoint form action button from the ribbon bar.  Select Commit and Navigate to page (in this order). Select the Navigate to page (right side) and click settings to specify your home page. 
          If you take a look at the code behind of the button you will see the following:   
  <input name="save1" type="save" value="save" onclick="javascript: {ddwrt:GenFireServerEvent('__commit;__redirect={Test.aspx}')}"
  • Save and Test

Thursday 22 May 2014

This form template is browser-compatible but it cannot be browser-enabled on the selected site Infopath Designer

Steps to solve this issue
 

1. Navigate to your Site then go to Settings> Site Settings > under Site Collection Administration > click "Site Collection Feature" .

2. From the list of available features, please find "SharePoint Server Enterprise Site Collection features"and click Activate.
 

This form cannot be opened in a Web browser. To open this form, use Microsoft InfoPath.

Steps to solve this issue
 
1. Navigate to your Site then go to Settings> Site Settings > under Site Collection Administration > click "Site Collection Feature" .

2. From the list of available features, please find "SharePoint Server Enterprise Site Collection features"and click Activate.

If error persist re-publish the form, and make sure the "Enable this form to be filled out by using a browser" is checked.
 

Tuesday 20 May 2014

Errors were found when compiling the workflow. The workflow files were saved but cannot be run. SharePoint 2013

Recently I had come up with a strange issue when trying to publish SharePoint 2013 Workflow. The error is
 
 
After Re-registering the Workflow Service in  PowerShell using the -force parameter the error gone and the workflow published successfully.

Register-SPWorkflowService –SPSite http://sharepointsite –WorkflowHostUri http://localhost:12291 –Force

Thursday 15 May 2014

Unable to start Workflow manually by system account Share Point 2013

Last week I had come up with this issue. I had tried whatever I know. But for Share Point 2013 edition workflow, once the workflow is triggered, the Internal Status of the workflow instance is first changed to "Started", then ended as "Suspended".

Finally I have ended up with a conclusion that, we have to run workflow as "non-system account" for both manually and automatically.

But we still can manually run Share Point 2010 edition workflows on SharePoint 2013 with System Account.

Wednesday 14 May 2014

How to change the url of a document library in SharePoint

When you create a document library in SharePoint, normally both name and url will be same. If you put any space in the library name, that makes you trouble in url. In that case if you want to change the url,
  1. Login as site collection admin.
  2. Open the site in SharePoint Designer
  3. Locate "All Files" from left hand navigation pane, which will open all folders in your site on the right.
  4. Right Click on the list that you want to change the URL/Web Address for and choose "Rename"
Renaming the library will not make any change to the attached workflow, the Workflow history as well as version history will update with new url.

However, we have to re-save the List Title/Description/Navigation settings because the left nav link did not get updated. Open the new library url in browser. Go to library settings, click on List name ,description and navigation and do save.

Hope this helps..

How to change FireFox’s default Accept header to JSON

As everyone knows SharePoint 2013 REST APS doesn’t understand the $json, it will render its result in XML, however there are quite a few tools there that can convert XML to JSON. Here I have used the default “Accept” HTTP header of the FireFox browser to see JSON. Steps to change this as follows.
  1.  In the address bar in FireFox, type “about:config”.
  2.  Click the “I promise” button.
  3.  In the search bar type “network.http.accept.default”.
  4.  Double-click the Preference Name.
  5.  Enter the String value as "application/json;odata=verbose"

Now when we use FireFox to view WebApi results it defaults to JSON and not XML


Thursday 8 May 2014

An exception occurred when trying to issue security token: There was no endpoint listening SharePoint 2013

Recently I got stuck with the below issue while publishing workflow. When I checked the Event viewer got the following Error.

"An exception occurred when trying to issue security token: There was no endpoint listening athttp://localhost:32843/SecurityTokenServiceApplication/securitytoken.svc/actas that could accept the message. This is often caused by an incorrect address or SOAP action ."
The issue is generally caused by the service application is not provision, and the application pool for the service application is not running.
To fix the issue, please follow these steps:
  1. Open Internet Information Manager(IIS)
  2. Go to "Application Pools"
  3. Select "SecurityTokenServiceApplicationPool", ensure its status is "Start".
  4. After that, open "SharePoint 2013 Management Shell". Run the following command:
     
    $sts = Get-SPServiceApplication | ?{$_ -match "Security"}
    $sts.Status
    $sts.Provision()
      
  5. Do IISReset

How to save Publishing Site as template SharePoint 2013

SharePoint doesn’t support saving publishing sites as a template. But there is an easy way to save the template of a publishing site in SharePoint 2013 . The steps are as below.

1.Deactivate the Publishing feature of the site.
2. Open the site in SharePoint Designer 2013.
3. In SharePoint Designer, under Sites tab select “Site Options” (see screen below)
4. Find 'SaveSiteAsTemplateEnabled' in Site Options (see below). 
5. Click on Modify button and change value “true”.

6. Now you can find 'Save site as template' Option under Site Settings (http://sitename/_layouts/15/settings.aspx) and create the template.
7. Your template is saved under solution gallery(/_catalogs/solutions/Forms/AllItems.aspx)
 

Tuesday 15 April 2014

How to login with different user in SharePoint designer

To start SharePoint Designer 2013 as another SharePoint user, Start the Spedesign.exe process by using a different user account. Steps to do this.

1. Go to the SharePoint Designer 2013 installation folder. By default, the folder is installed in the following location:
C:\Program Files\Microsoft Office\Office15
2. Press and hold the Shift key, right-click Spedesign.exe, and then click Run as different user.
3. Type the credential of the user and then click OK.


Thursday 3 April 2014

Poll webpart for SharePoint

Found this link very useful for creating Poll Web part in SharePoint web application.
http://spjsblog.com/2010/11/23/poll-for-sharepoint/

How to map a network drive to the master page gallery sharepoint 2013

There is an easy way to upload design files or packages by mapping the Master Page gallery to a Network drive.
Before doing the below steps make sure Web Client service is started under services. If the Web Client service name is not present you must install the Desktop Experience Windows feature .

The steps to map a network drive to gallery
1. Click on Design Manager in your publishing site.
2. Select the third option Upload Design File

 
Here we can check the page that contains the location of Master Page Gallery. Location ends with /_catalogs/masterpage as shown in the image above. This is the location that we need to map the network drive.
 
3. Right click the computer and select 'Map network drive'


4. Select any Drive and click the red marked link
5. Paste the url to the master page gallery
6. Now our mapped folder is under network location. By checking the mapping folder, we can see all the master pages

Install Desktop experience in Windows Server 2012

Steps to enable the Desktop Experience on Windows Server 2012
1.Start Server Manager
2.Select Add roles and features


3.Skip the information page by clicking Next.
4.Select Role-based or feature-based installation as installation type and click Next.
5.We want to install the Desktop Experience feature on the local server which is also selected by default so choose Next.
6.The Desktop Experience feature is not a Server Role, so skip the Server Roles page by clicking Next.
7.At the Select Features page,  expand the option  User Interfaces and Infrastructure (Installed) and Select Desktop Experience.


8.Click Add Features (on the next dialog window)
9.Click Next
10.Click Install
 

11. After the installation has completed, restart the server
12. Start the Web client service under services


Hope this helps..

Friday 21 March 2014

An exception occurred while enqueueing a message in the target queue. Error: 15404, State: 19. Could not obtain information about Windows NT group/user, error code 0x5

Recently my DB server ran out of space and DB Error LOG file was occupying about 20 GB. When I checked Application Event log of my DB Server and saw an error filling up around 20 times in 1 second.

An exception occurred while enqueueing a message in the target queue. Error: 15404, State: 19. Could not obtain information about Windows NT group/user 'Domain\user', error code 0x5.


The SQL Server service account and the SQL Server Agent account requires the same account but with DOMAIN ADMIN privileges. In my case the SQL DB service was ran by local administrator. I have changed local administrator to domain user account and restarted the service.

Then SQL comes up without any of these messages in the Event Viewer and DB Error log file stopped generating.

Hope this helps anyone else having the same issue.

Wednesday 19 March 2014

Automatically create Items in a SharePoint Library using a SharePoint Designer workflow

There might be some requirements like create an item automatically in a library/list when an item is added in to a different library/list.

For this create a workflow in SharePoint designer for first Library which creates a new Item on second Library with the given item values and set the workflow to "Start workflow automatically when an item is created". Steps are as follows

Step 1. Add a Create List Item action.


Step 2. Click the “this list” link, and in the dialog box, select the document library to which you attached your custom content type. This will give you two values to fill out, one for the Content Type ID and one for the Path and Name, the latter being a required field in the Document content type.

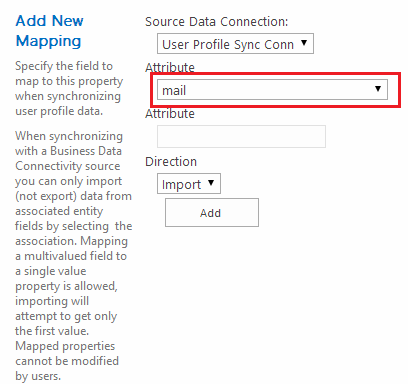
Step 3. You can add different columns which you want to be auto populated by the column values from first list. For this create the Columns you want in the second list and map with corresponding columns with first list columns as shown in the below screen.

If the selected list is a form library the Content Type ID will be Form, or it is a document library the Content Type ID will be Document.
Step 4. Modify the “Path and Name” value to [%Current Item: Name%]. If you want a word document to be created, just change the value of Path and Name field as [%Current Item: Name%].docx
Step 5. Click OK. Save and publish the workflow.
 
Go back to your SharePoint list that’s associated to workflow you just created and create a new item.  When the Create Item action is executed, a new entry should be created in your second List and columns also auto populated from first list.

Hope this helps..

Tuesday 18 March 2014

Email is not syncing after full user profile synchronization SharePoint 2013

Recently I got stuck with this issue and had tried recreating user profile service and full synchronization. Finally I came to know that by default User profile application is syncing the Work Email with AD attribute proxyAddresses and not with the attribute mail. Then I changed AD attribute proxyAddresses to mail and did a full synchronization. Email Addresses are started showing for each user in Central Admin. Steps are as follows

Step 1. First check if the User Profile Sync Service has started form system settings->manage services on server

Step 2. From Application management -> manage service applications->User Profile Service Application -> manage properties->select work email and edit the property


Step 3. Click the button 'Remove' and select 'mail' from attributes and click Add

Screen 1


Now the work mail is configured with mail attribute


Step 4. Start a full sync after changing this setting and the mail addresses will be filled in for users.


Friday 14 March 2014

How to Disable loopback check

Some times we might get 401.1 Access denied error when trying to access the fully qualified domain name (FQDN) of our SharePoint site from the server. To fix this add a registry key to disable the loopback check. There are two options to do this.

By Manually

  1. Click Start, click Run, type regedit, and then click OK.
  2. Locate and then click the following registry subkey: HKEY_LOCAL_MACHINE\SYSTEM\CurrentControlSet\Control\Lsa
  3. Right-click Lsa, point to New, and then click DWORD Value.
  4. Type DisableLoopbackCheck, and then press ENTER.
  5. Right-click DisableLoopbackCheck, and then click Modify.
  6. In the Value data box, type 1, and then click OK.
  7. Exit Registry Editor.

By Power Shell Command

New-ItemProperty HKLM:\System\CurrentControlSet\Control\Lsa -Name "DisableLoopbackCheck" -value "1" -PropertyType dword

Make sure to reboot your server afterwards.
Hope this helps...

Monday 3 March 2014

InfoPath cannot save the following form. This document library was either Deleted or renamed

I have faced this issue recently on my new SharePoint 2013 server. The scenario was when I publish the form to a library, the form creates the library, but when I click OK on the error message window the Library disappears from the site.


To workaround this issue

2. Reboot the server
3. After that start Themes service form Windows Service Console

Hope this helps.


Tuesday 11 February 2014

Embed an Image into a SharePoint Designer Workflow Email

Here I am just sharing a quick tip to embed an image inside an email body

Below are the steps 
  •  Upload the image to share point site. Here I  have uploaded the image to site collection images library
  •  Open SharePoint Designer and create a workflow variable.
      Here the name is _VarImage, 
  •  Add an action "Set Workflow Variable" 
  • Select the variable from "Add or Change Look up". Then copy the url of the image from share point library and paste in the string buider as below
     
  • Next, add a "Send an Email" action.  Open the "Define E-mail Message" window and select to "Add or Change Look up".  Select the workflow variable for which you just assigned a value.
When you are done, your workflow email should look something like this .

  •  Save and publish the workflow.

After that ensure your email client is downloading images from Outlook. Add SharePoint email to the safe senders list. Then you will get a pretty image in your Outlook email.